| 04-18-2016, 04:09 PM | #1 |

1771
Rep 7,653
Posts |
IND | F87 M2 BMW M Performance Rear Diffuser DIY
BMW F87 M2 M Performance Diffuser DIY
Tools Needed: 8mm Socket Extension Ratchet Pry tool for push rivets Step 1: Remove the two 8mm screws on each end. These will be reused with the new diffuser. Step 2: Remove the six pop rivets using a pry tool. These will be reused with the new diffuser. Step 3: Start on either the right or left side by pulling on the diffuser to release the tabs. The ends come out with ease whereas the center section will need a good amount of force to release the tabs that hold it in place. Step 4: Press the M performance diffuser in. On our car we found that the ends clip in place easily, but the center took some effort to ensure the clips engaged. I found that pressing on the inside of the bumper while pressing from the diffuser simultaneously made it easier. Step 5: Press the six pop rivets back into place. Step 6: Screw the two 8mm back into place.  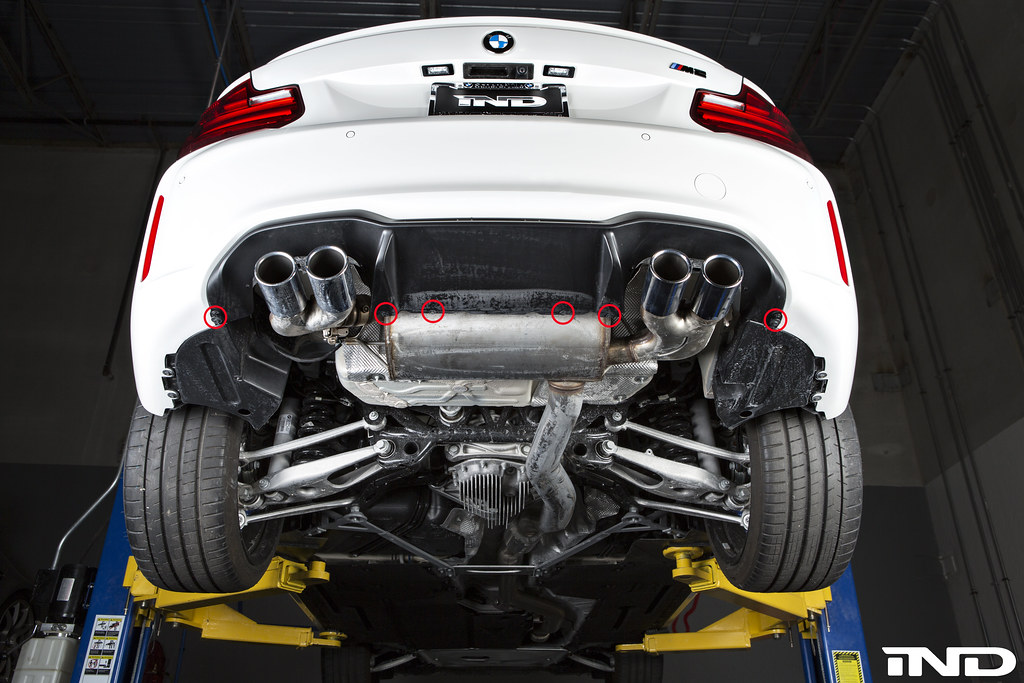 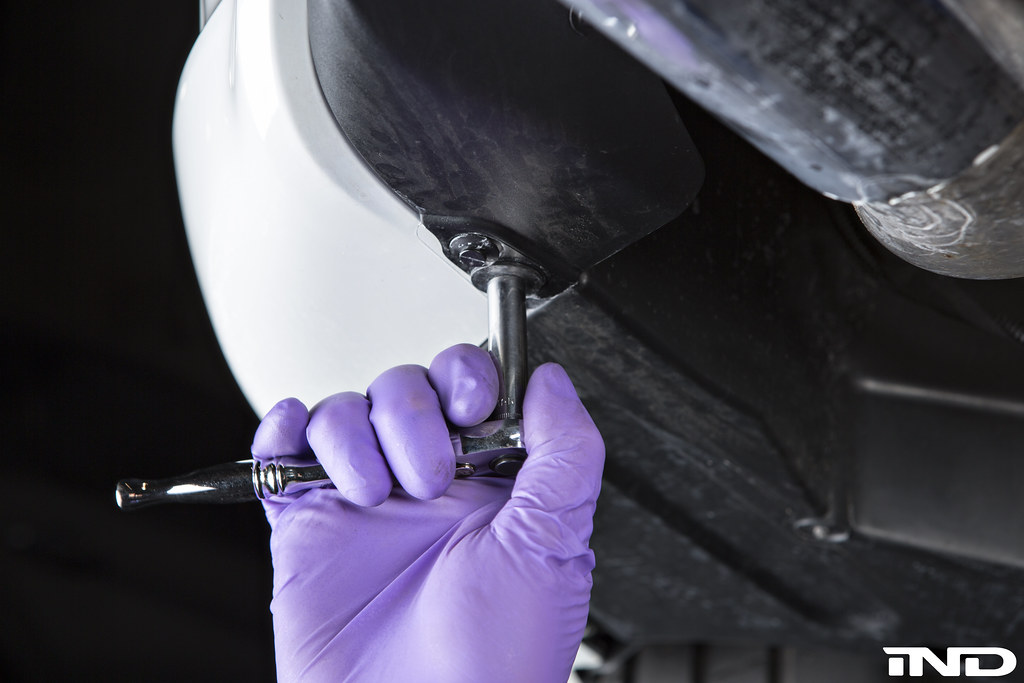 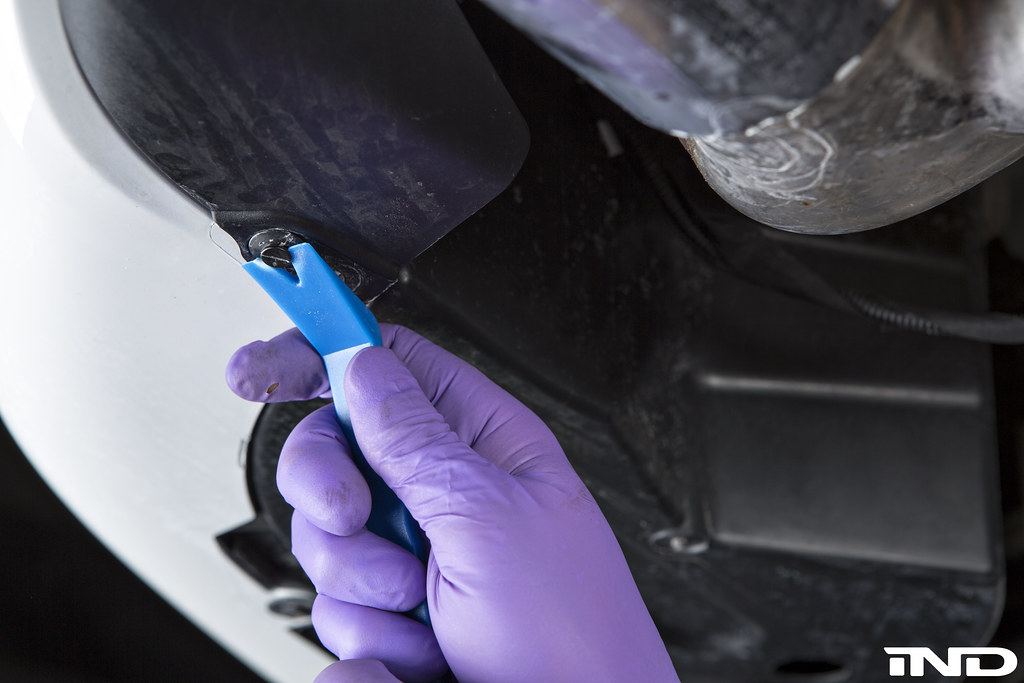 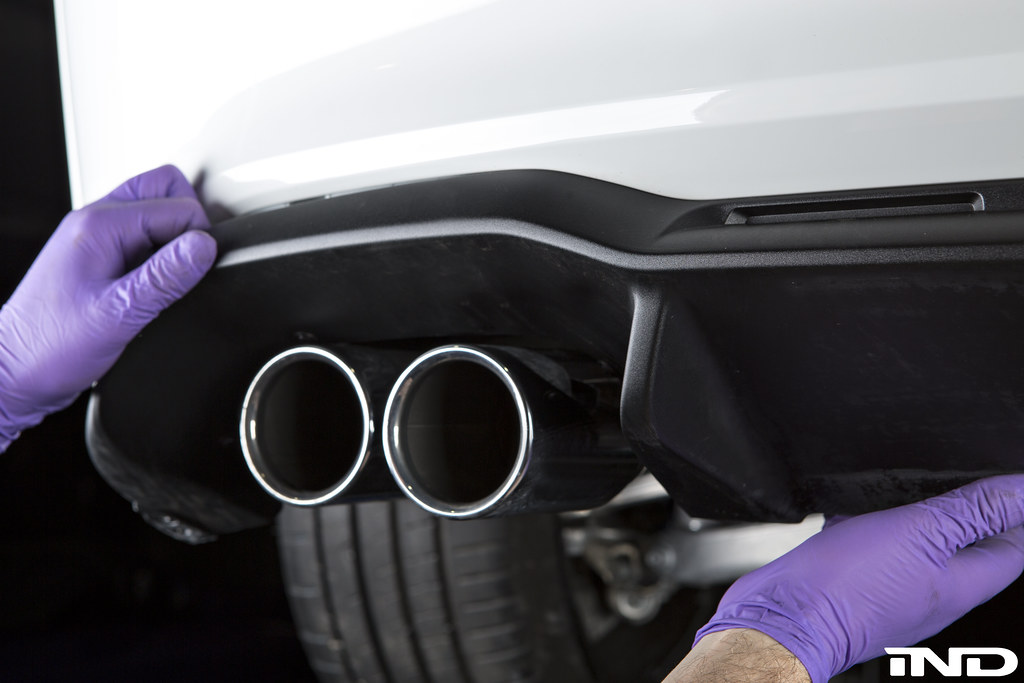 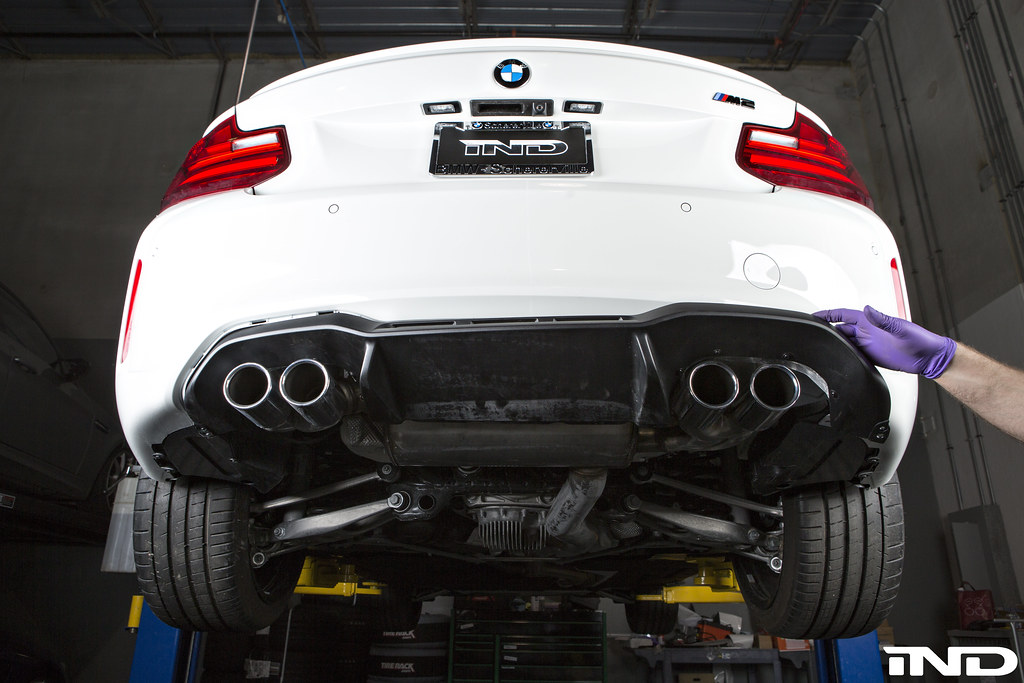 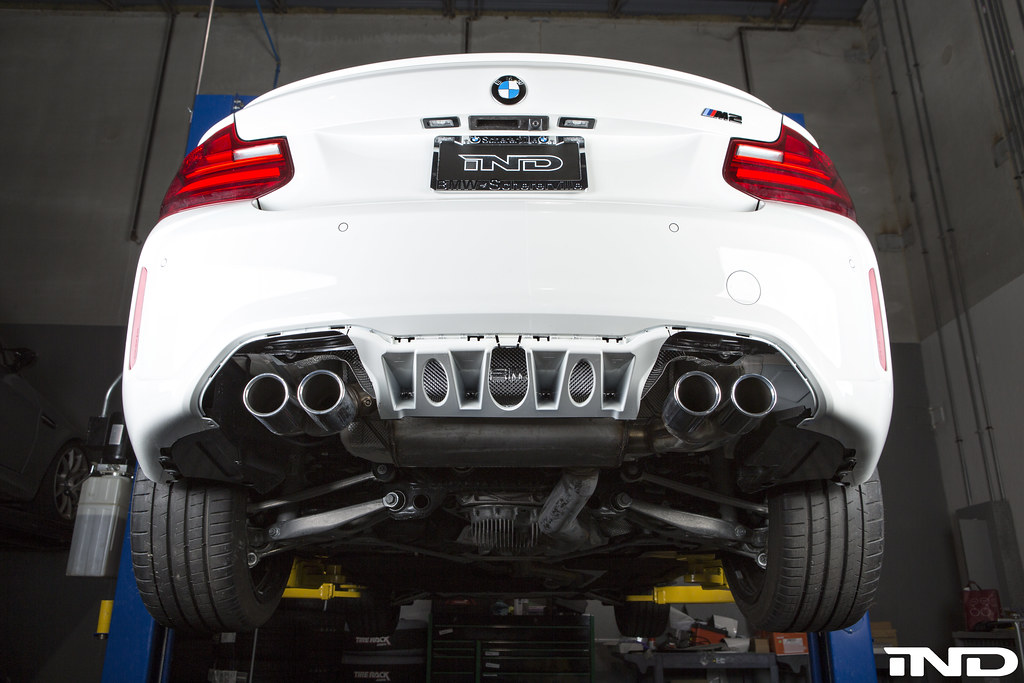 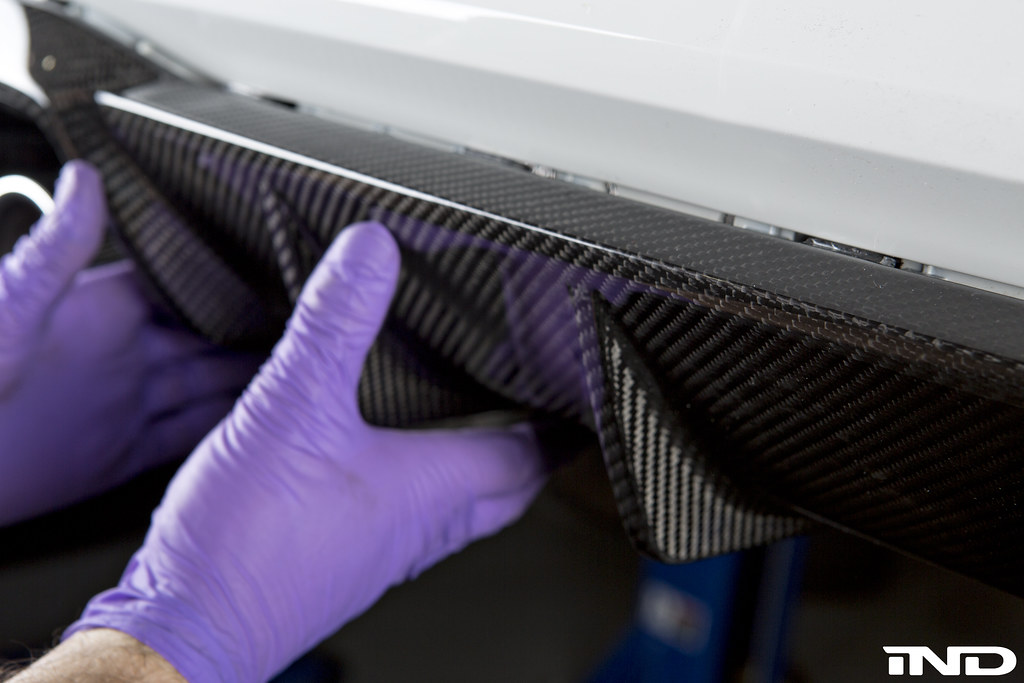 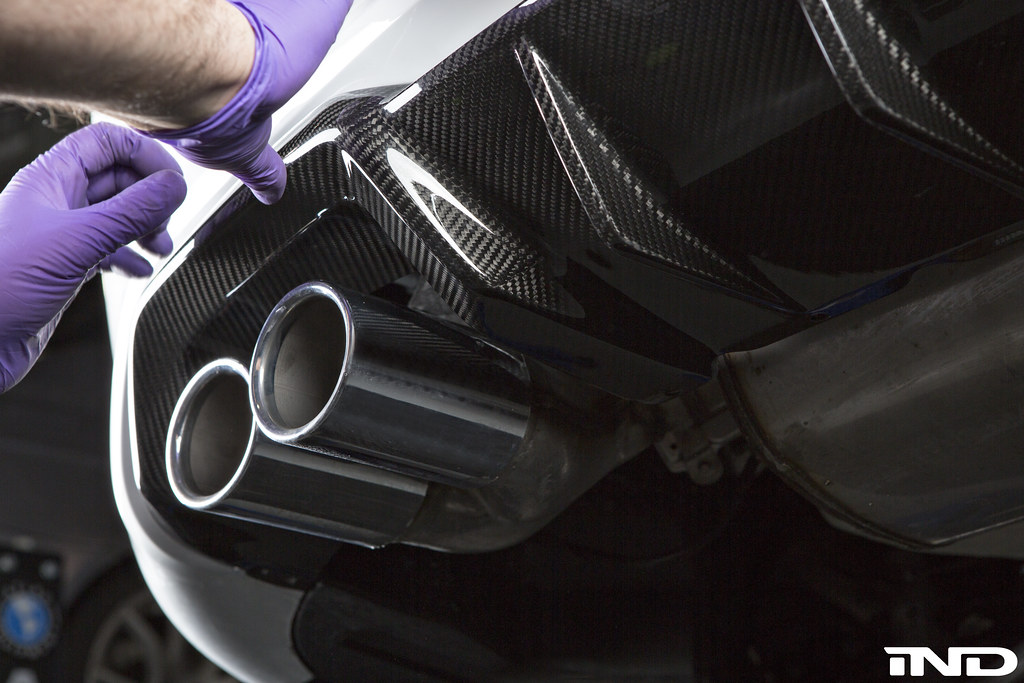 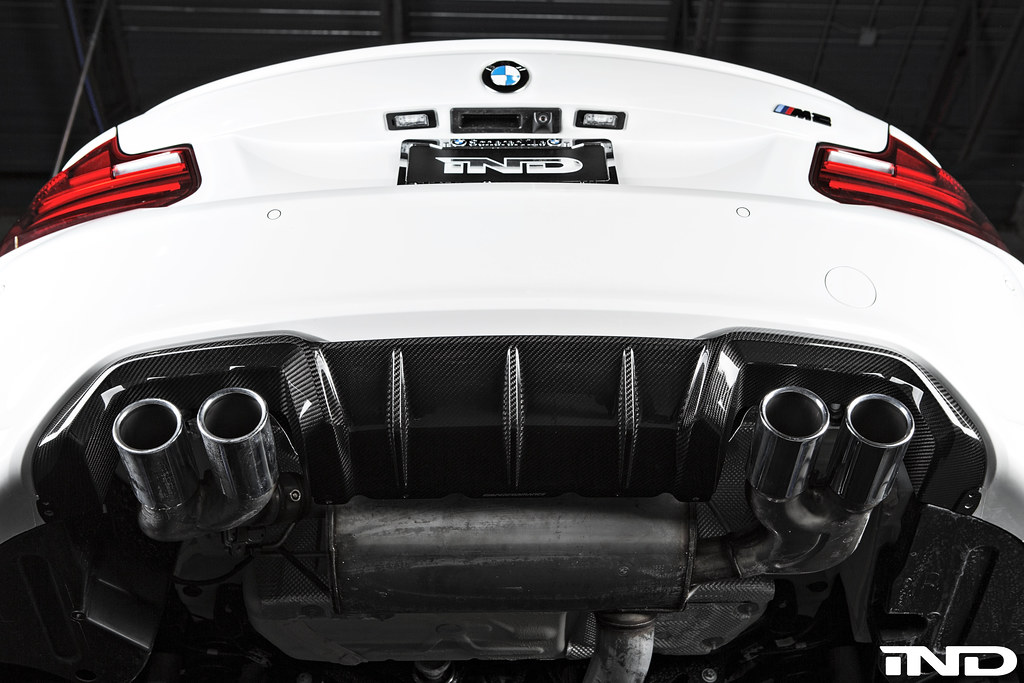
__________________
|
|
Appreciate
11
|
| 04-18-2016, 09:59 PM | #2 |
|
Dinosaur supervisor


3030
Rep 4,214
Posts |
Strange, I have a screw just above the tips on both side you can't reach without removing the exhaust. At least it felt that way, have to take a second look now.
Good job with all the DIY! |
|
Appreciate
0
|
| 04-19-2016, 10:16 AM | #3 | |
|
1771
Rep 7,653
Posts |
Quote:

__________________
|
|
|
Appreciate
1
|
| 04-19-2016, 01:45 PM | #4 | |
|
Dinosaur supervisor
3030
Rep 4,214
Posts |
Quote:
Thanks a ton! |
|
|
Appreciate
0
|
| 04-24-2016, 12:06 PM | #5 |
|
Dinosaur supervisor
3030
Rep 4,214
Posts |
Did you just pull it straight out? Slowly pull or quick pull?
Tried to remove it today and the sides were no problem at all but the center ones were impossible, pulled as hard as I dared but all that happens was my rear bumper flexing. |
|
Appreciate
0
|
| 04-25-2016, 06:49 AM | #6 |
|
Colonel
 
4405
Rep 2,856
Posts
Drives: BMW M2 CSL Turbomeister
Join Date: Sep 2013
Location: Travelling / Managing / Writing
|
Excellent write up! It only leaves us with one question. The BMW manual for this upgrade states that a software upgrade is required after fitting the new diffuser.
Any thoughts on this? Is it really required yes or no? Felt any difference while driving with the new diffusor. MR |
|
Appreciate
0
|
| 09-24-2016, 02:07 PM | #8 |
|
Lieutenant

262
Rep 561
Posts
Drives: '23 M5 Comp
Join Date: Mar 2008
Location: Columbia, TN
|
Any updates on this?
Has anyone figured out a better way to deal with the center tabs? I do not want to break the factory piece, but I'm more worried about damaging the carbon fiber tabs that are a lot more delicate.
|
|
Appreciate
0
|
| 09-24-2016, 05:22 PM | #9 | |
|
Supremekev
97
Rep 125
Posts |
Quote:
|
|
|
Appreciate
0
|
| 11-27-2016, 12:35 AM | #11 |
|
Second Lieutenant
292
Rep 254
Posts |
10 outa 10 hard. Very real moments where I questioned if this was even possible. Taking out the 4 center screws that hold on part of the exhaust heat shield is the only way. No idea how the guy above me did this in 30 mins.
|
|
Appreciate
0
|
| 12-10-2016, 11:56 PM | #14 | |
|
Second Lieutenant
292
Rep 254
Posts |
Quote:
|
|
|
Appreciate
0
|
| 01-21-2017, 03:23 PM | #15 |
|
New Member
16
Rep 10
Posts |
I also had a tough time with the center clips. Opening the heat shield in the middle seemed to help some, but in the end, I think pulling harder is what did the trick. The clips seem to have a self tightening effect which prevented me from pushing them out from the back. There are also small perferations in the bumper cover that it felt like I ripped slightly. so be careful around those areas. you can see them in the IND pics above.
Fitment was pretty good on mine, except the driver side seems like its off by 2mm. not sure if user error on my part, or what? have to get really close to see the issue though. over all it looks great. Can someone confirm that the two circled pieces in the attached photo are not necessary with the M Performance diffuser? thanks. |
|
Appreciate
0
|
| 01-21-2017, 07:11 PM | #16 | |
|
Second Lieutenant
292
Rep 254
Posts |
Quote:
__________________
2017 M2 - AW DCT - BM3 93 oct, Pure Stage 2, FBO, happy
 2013 BRZ - was a GREAT car... just not fast enough 2008 VW GTI - first experience with boost 97 Integra GSR - crashed it |
|
|
Appreciate
0
|
| 01-31-2017, 07:33 AM | #17 |
|
New Member
5
Rep 11
Posts
Drives: 2017 M2 (LBB)
Join Date: Jun 2011
Location: Brisbane, Australia
|
Thanks for the guide and pictures.
Unfortunately you haven't adequately described the releasing of the 4 middle clips on the original diffuser. What a "son of a gun" ! Still worth all the effort....carbon looks great. Thanks again |
|
Appreciate
1
MerlinPurple688.50 |
| 02-01-2017, 03:46 PM | #18 |
|
Lieutenant

475
Rep 549
Posts
Drives: The Bus
Join Date: Oct 2016
Location: Berkshire
iTrader: (0)
Garage List 2017 Ford Focus RS [0.00]
1971 Mk3 Austin Min ... [0.00] 2013 MINI R56 GP [0.00] 2013 MINI R55 Clubvan [0.00] |
I did this to my car a few weeks back. I found using the flat round end of a plastic trim tool to push against the 4 centre clips helped release them. I though it was harder to fit the CF diffuser
 |
|
Appreciate
0
|
| 02-01-2017, 06:39 PM | #19 |
|
Lieutenant
262
Rep 561
Posts
Drives: '23 M5 Comp
Join Date: Mar 2008
Location: Columbia, TN
|
I ended up getting a sweet deal from my dealer that was cheaper than any place that I could buy the part from. It took the dealer technician over an hour to do the installation and had to go get a second one to help him out...
Not sure what BMW did to the design. I did the one on my 135i with NO issues and the one in the M4 with no issues either. |
|
Appreciate
0
|
| 03-13-2017, 02:30 AM | #20 |
|
Registered
3
Rep 1
Posts |
I removed the 4 center tabs by first removing the bottom screws from the inside middle part of the heat shield, inserting my hand through inside diffuser and using a flat heat screwdriver to push the 4 center clips down, while pulling the diffuser away from the outside. These 4 center tabs were near impossible to take out. There is absolutely no way to take it off by simply pulling from the outside without breaking anything.
|
|
Appreciate
2
Norcalmav23292.00 chief1richard383.00 |
| 03-19-2017, 10:47 AM | #22 |
|
Private

118
Rep 74
Posts |
I just bought a used one but none of the tabs would clip onto the bumper. Not even the corner tabs. Anybody else having this issue? It seems like the tabs aren't long enough. The previous owner told me only BMW tech can do the install.
|
|
Appreciate
0
|
Post Reply |
| Bookmarks |
|
|