
 M2 Technical Topics >
Navigation, iDrive, Audio, Video, Bluetooth, Phone, Cameras, Electronics >
Rear parking sensor on/off switch installed
M2 Technical Topics >
Navigation, iDrive, Audio, Video, Bluetooth, Phone, Cameras, Electronics >
Rear parking sensor on/off switch installed
M2 Technical Topics >
Navigation, iDrive, Audio, Video, Bluetooth, Phone, Cameras, Electronics >
Rear parking sensor on/off switch installed
M2 Technical Topics >
Navigation, iDrive, Audio, Video, Bluetooth, Phone, Cameras, Electronics >
Rear parking sensor on/off switch installed
| 04-19-2017, 06:04 PM | #134 |
|
Never underestimate the Home-Bowl

484
Rep 821
Posts
Drives: F87 M2<E92 M3<E46 M3
Join Date: Jul 2011
Location: UK
iTrader: (0)
Garage List 2017 BMW M2 [0.00]
2016 BMW M235i [0.00] 2012 BMW 120d M Spo ... [0.00] 2010 BMW M3 - SOLD [10.00] 2002 BMW Z3 2.2i Sport [0.00] 2001 BMW M3 - SOLD [9.00] |
Interested in progress.
__________________
2017 F87 M2, MG, M-DCT
2002 E36/7 Z3 2.2 Sport 5MT 2016 F22 M235i Coupe, MW, ZF8 |
|
Appreciate
0
|
| 04-22-2017, 10:49 AM | #135 |
|
Second Lieutenant

101
Rep 246
Posts |
Rear Parking Sensor On/Off Switch now WORKING without backup camera
Afternoon All,
I have now installed the Wire between Pin 1 on the Console Switch and Pin 28 on the ICM Module and I now can turn off the beeping... It is working a treat. Everything is back in place, totally seamless. Major thanks to bmwdd for getting me interested in doing this mod and for steering me in the right direction, he deserves all the credit for this. Anyway, I spent all day on the mod, but you should allocate 2 - 3 hours depending on your ability. Leave plenty clearance around he car, so you have enough space to open both doors as wide as possible if required. It's a bit tricky moving the car once the battery is disconnected and the car is in pieces. If you are thinking of tackling this mod, please read the entire post, print it out and study it; Understand what is required. If you have any queries before you start please update the post, then others can benefit from the questions / queries and replies. Please take note of the disclaimer at the bottom of this post. The hardest thing for me as not removing the ICM connector but getting the rear vent air duct back in place, very fiddly and to need to squeeze it at appropriate times to make it fit past other obstacles in the centre console tunnel the good thing is I didn't have to remove the entire centre console. Although it is a bit of a nightmare job all told, good luck to all who start. This is how I went about it: I purchased a second hand used 54pin connector with wires already attached via ebay. 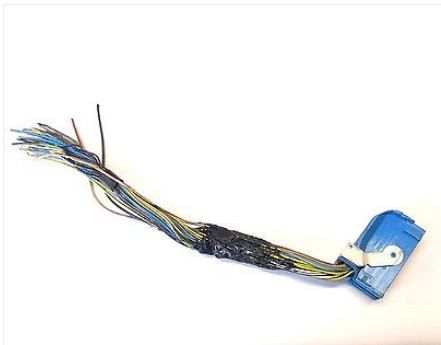 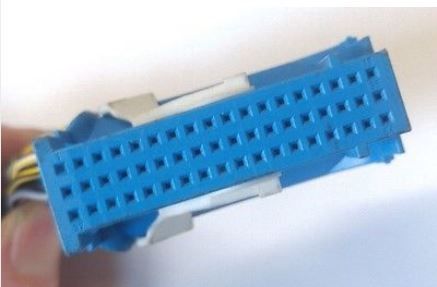 Firstly, so I could understand how the connector comes a part and secondly to remove 2 of the wires ~ Solder them together to make a wire about 1.5 feet long (cover the solder join with heat shrink insulation) and that is the new connecting wire for the mod. I didn't want to spend hours figuring out the right size of bushing contacts to order. I initially, disconnected the negative terminal on the battery within the boot/trunk, and put some insulating tape over the negative terminal just in case the cable moved itself and it touched the terminal again when I was half way through the job. Note: Don't shut the boot I pulled the handbrake boot out so I could see the ICM unit, starting by pulling it out from the top, and working down to the bottom. The handbrake boot does not need to come completely off but enough so you can see the unit to locate the ICM unit and know what you are up against. 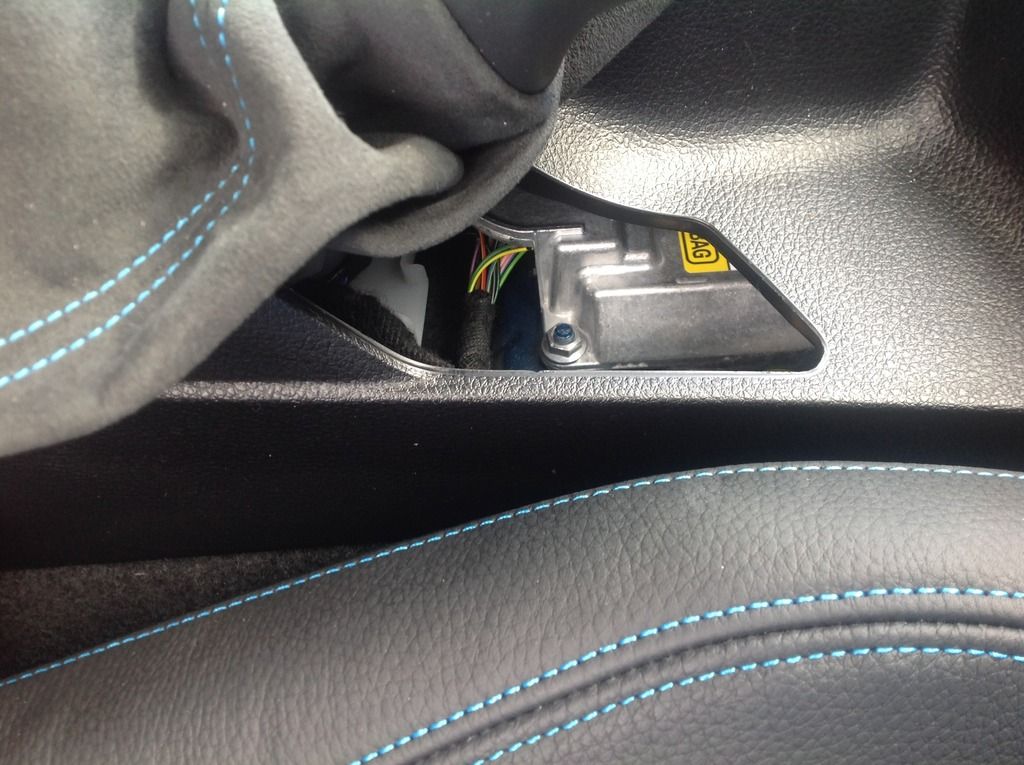 I have the smallest hands in the world and there is no way I could get into the unit to release the retaining latch to remove the connector via the space provided at the bottom of the hand brake boot. People on forums have suggested going in through the rear vent and that is what I did. Using trim tools to prize from the top left side, it is very tight, tip here is to just work away and be patient. 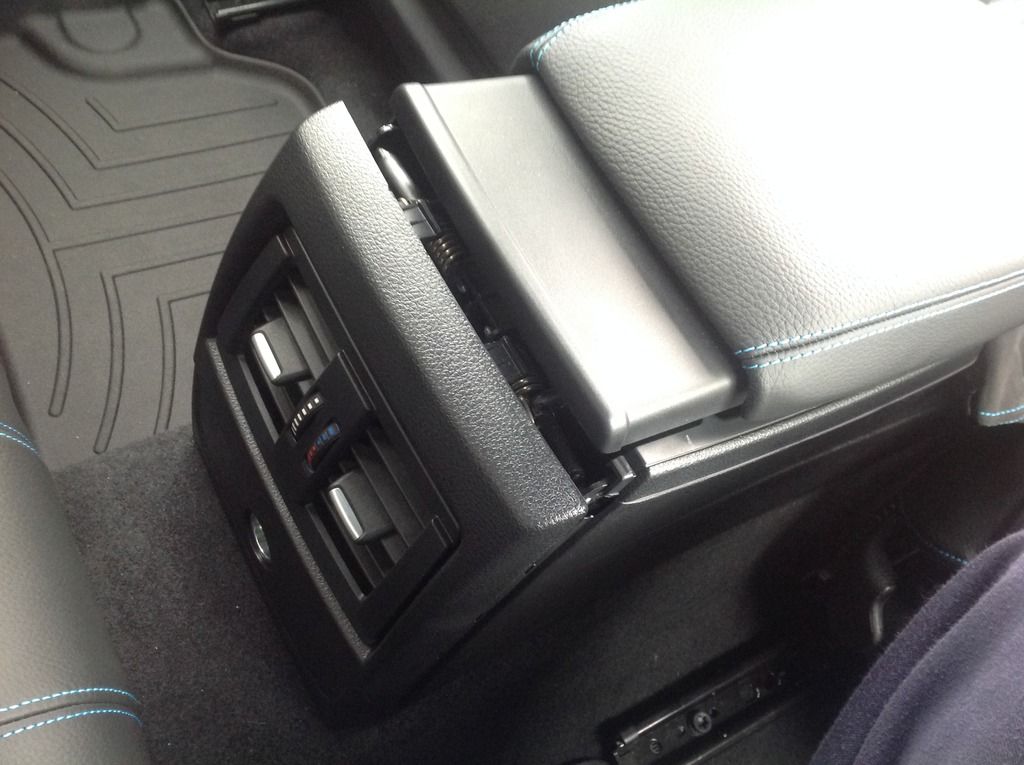 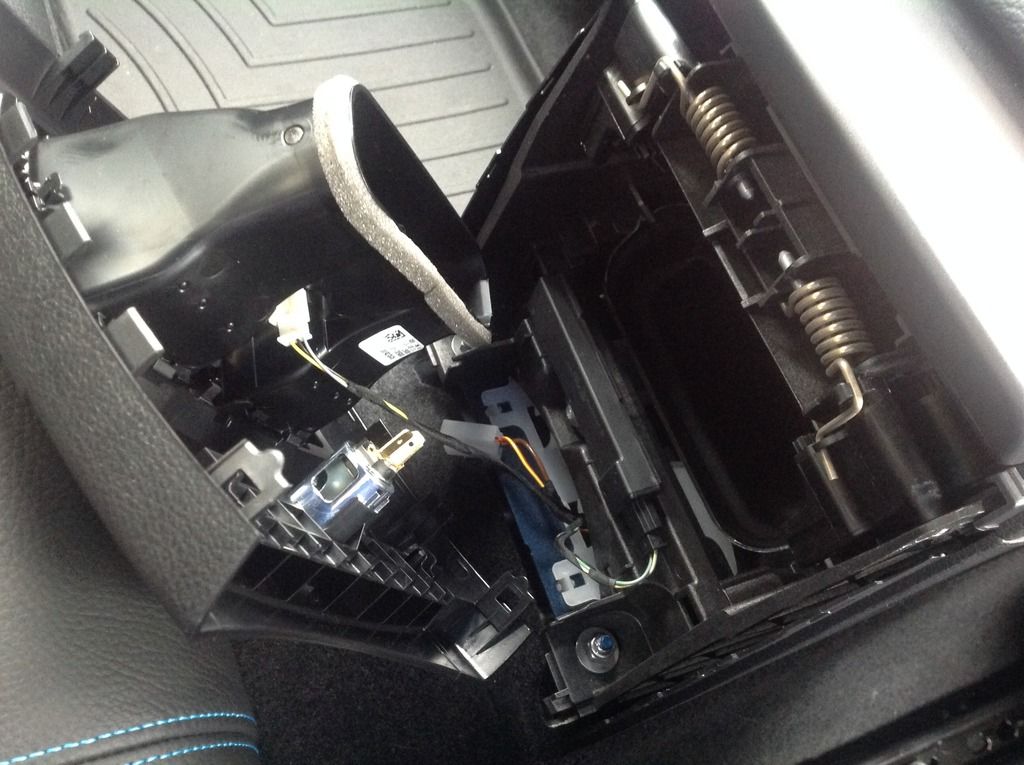 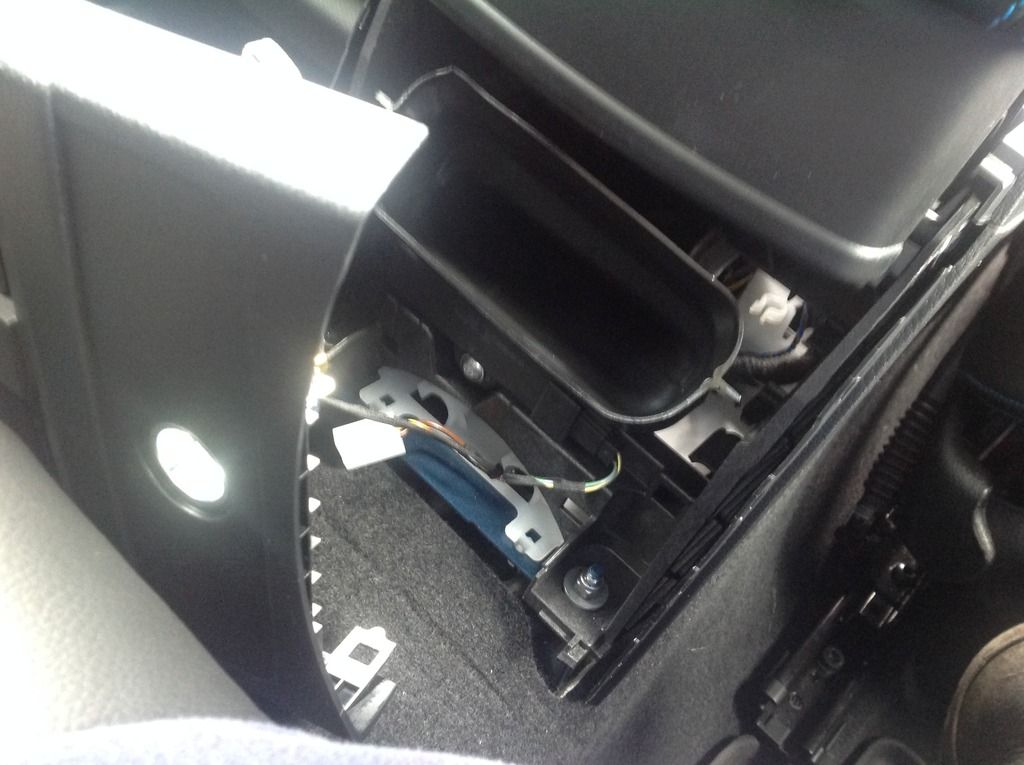 Disconnected both sets of wires and put the rear vent enclosure some where safe out of the car to make space for the rest of the work! Disconnected both sets of wires and put the rear vent enclosure some where safe out of the car to make space for the rest of the work!Next, I removed the centre console trim which has the control pad in the middle of it & disconnected the blue connector on the back of the trim (circled in red), work it up with trim tools (start from the arm rest end first, but take it easy as the narrow end is fragile). Followed by the gear surround and the console switch. 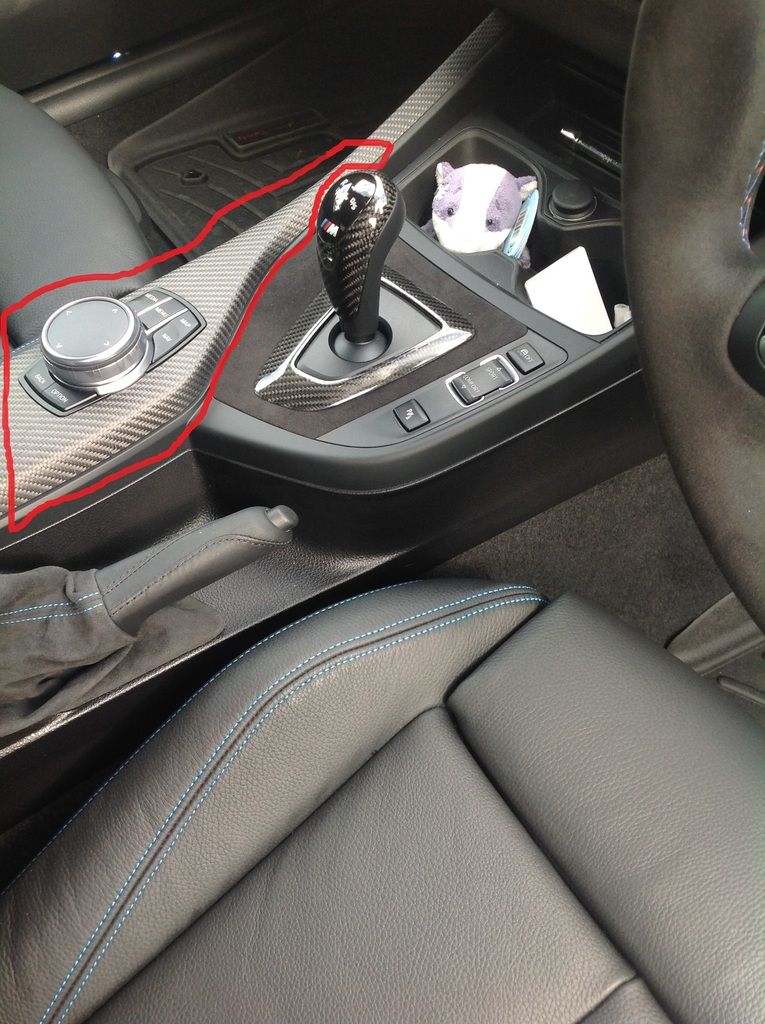 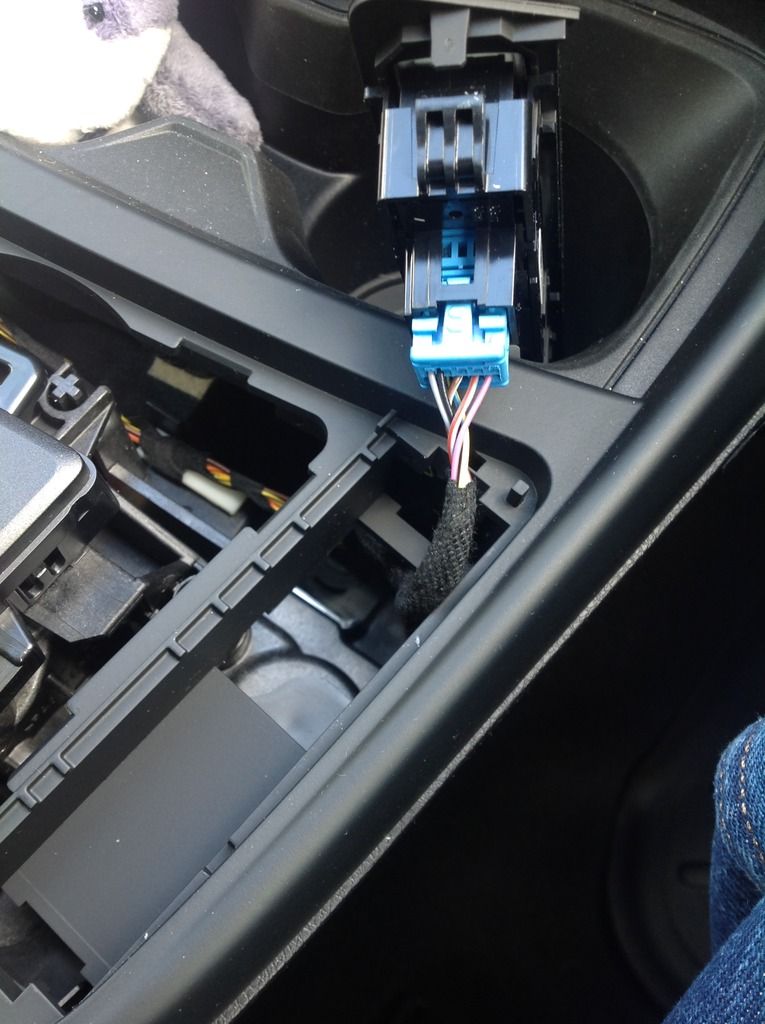 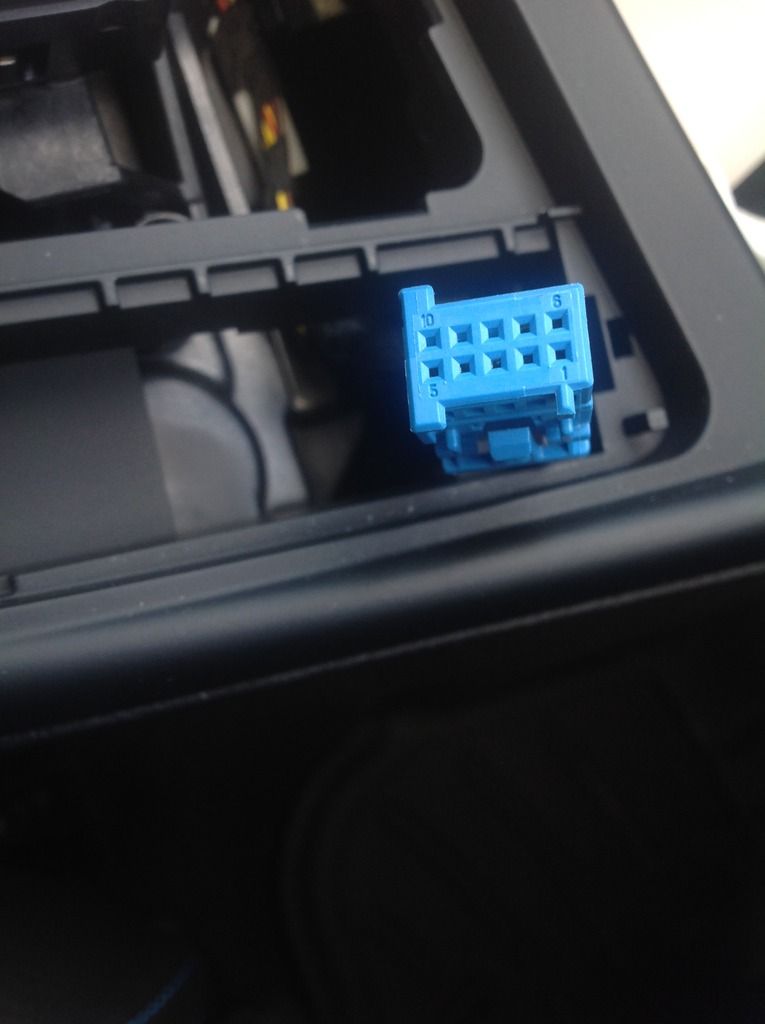 With these trims removed there is also a plastic trim frame which I also removed to provide a bit of extra working space (although not strictly necessary, this I did with my fingers). 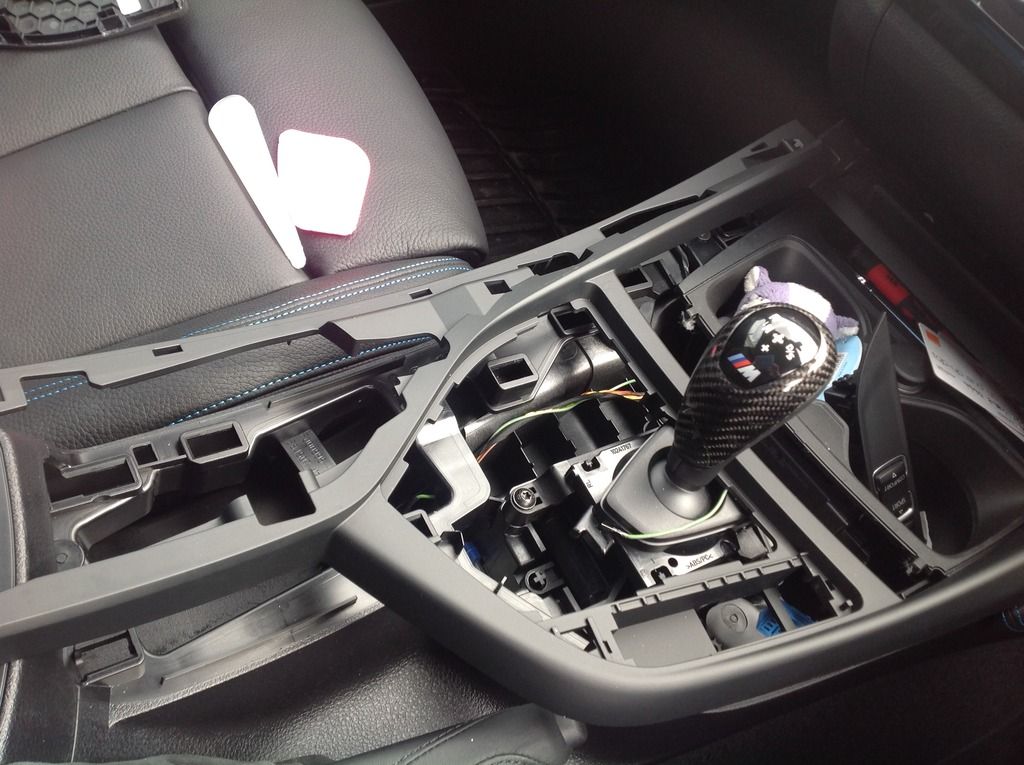 Now things get juicy, you need to remove the plastic air duct which routes the air through the centre console / arm rest to the rear seats. Once its removed you can clearly see the ICM module. The air duct is removed from the rear by pulling and wiggling to get it to come out. Initially you need to unclip the ends of the duct both on the left and right side (Circled in red & clipped fairly tightly), 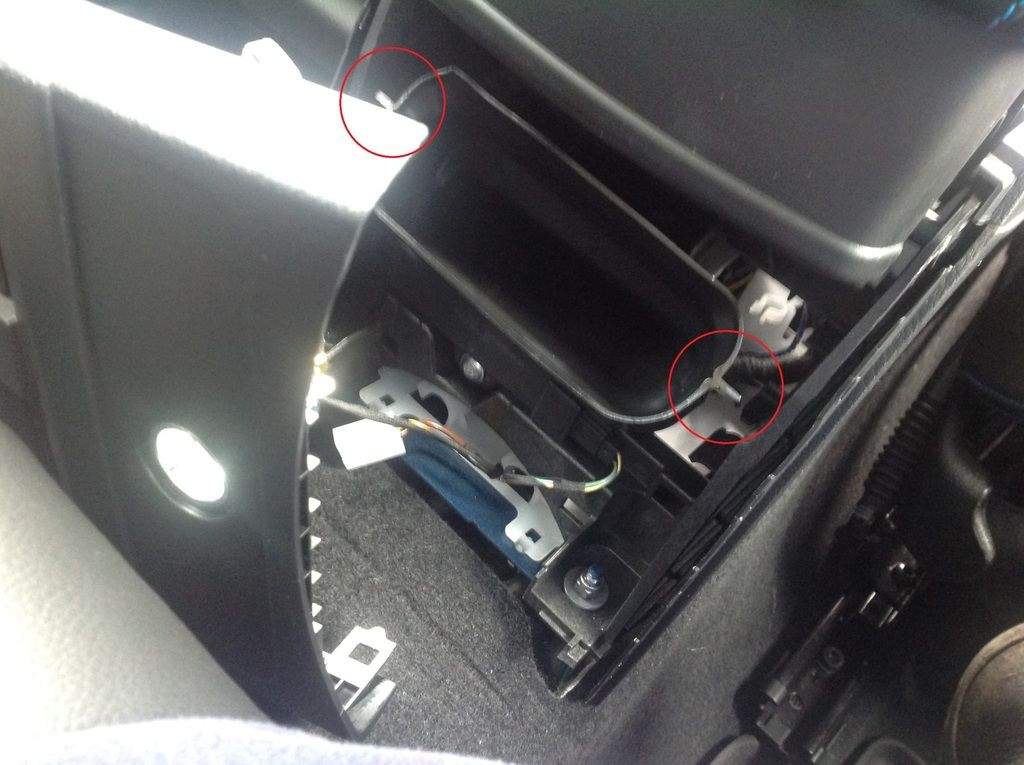 Then pull and wiggle the duct out. You may also want to remove the USB and Phono Socket trim piece from within the arm rest (This also gives you a view of the air duct along with an earthing point for the handbrake which is very close to the right side of the air duct. With the duct removed you can see the ICM Unit, it then just a matter of reaching down from above and unclipping the 54pin connector (There is a latch, which needs to be moved from right all the way to the left and the connector will easily disengage in your fingers, then pull it out of the exposed hole where hand brake boot sits. 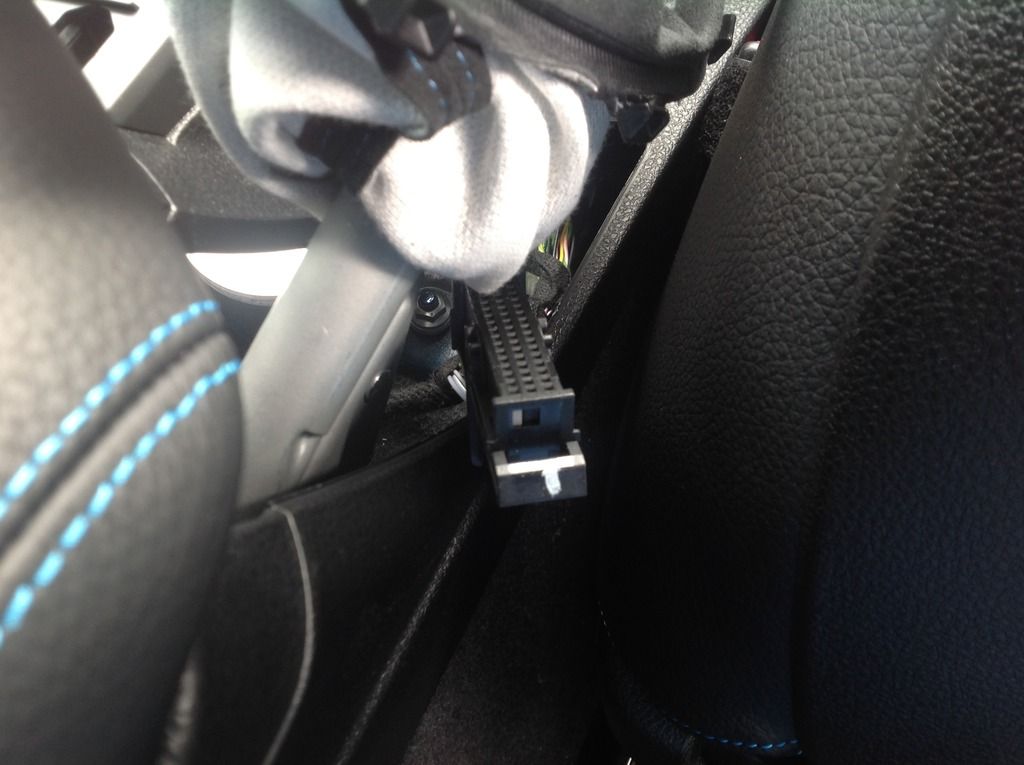 On the side of the connector there are cleats which hold the cable blocks in place, notice there is a Grey and a Black side to the connector. The Grey side should be ignored, but push in on the black cleat and pull the Black cable block out (gently), once out it should look like (see below) and you can see me inserting the pin connector wire into Pin 28. 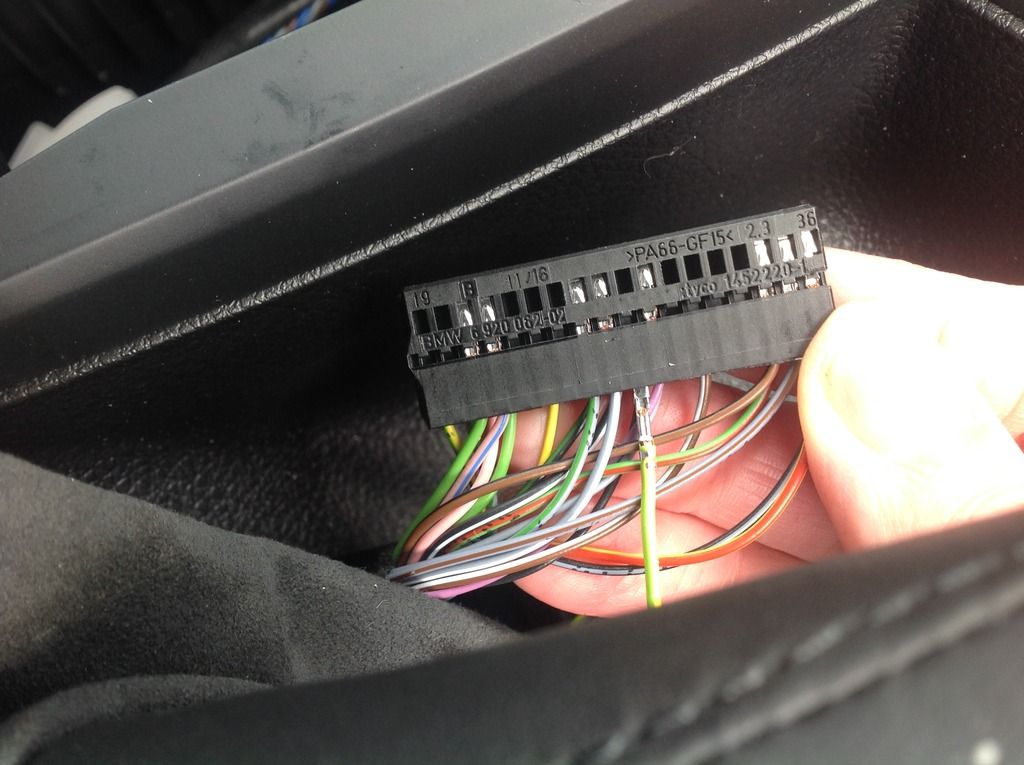 Once the cable pin is inserted, you will here it "click", then its a matter of carefully re-inserting the Black Block into the connector remembering which way around it goes, and then gently re-insert it connector back into the ICM Unit making sure the securing latch is all the way to the left (so that it engages) and it locks when the connector is in and the latch is moved all the way to the right. Now you need to route the other end of the newly inserted wire within the console and follow the existing wires around till it reaches the console switch connector (I wrapped my wire around the existing cable loom. This end of the wire needs to go into Pin1, you can see in the pic below the missing pin on the far right hole of the connector. 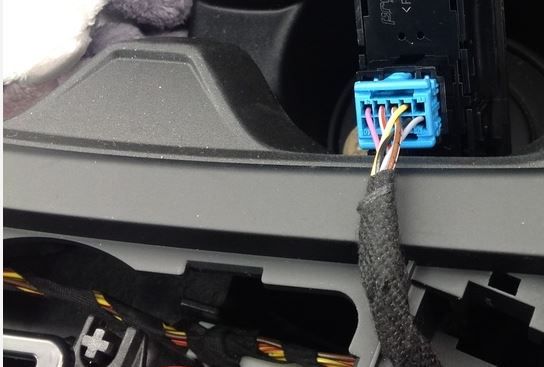 Note: You cannot simply push the connector pin in and it will catch (as suggested earlier), you MUST partially open up the connector to allow the pin to clip in. This is done by sticking a very small screwdriver (Jewellers) down where the 2 arrow is pointing in the gap and then levering up. 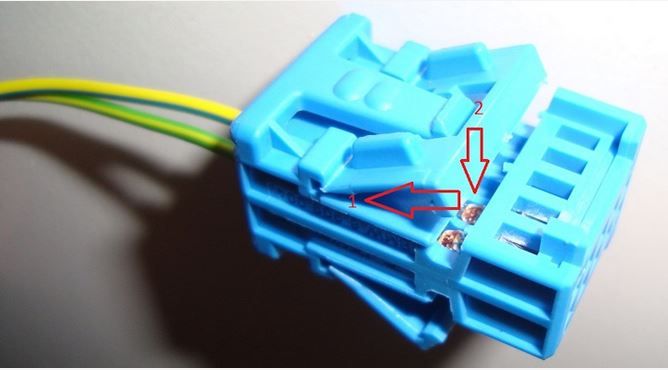 This will lift the clip and allow you to insert the connector pin. Once inserted simply squeeze the connector shut again. At this point you should re-clip the console frame into place (if you removed it like me earlier on), 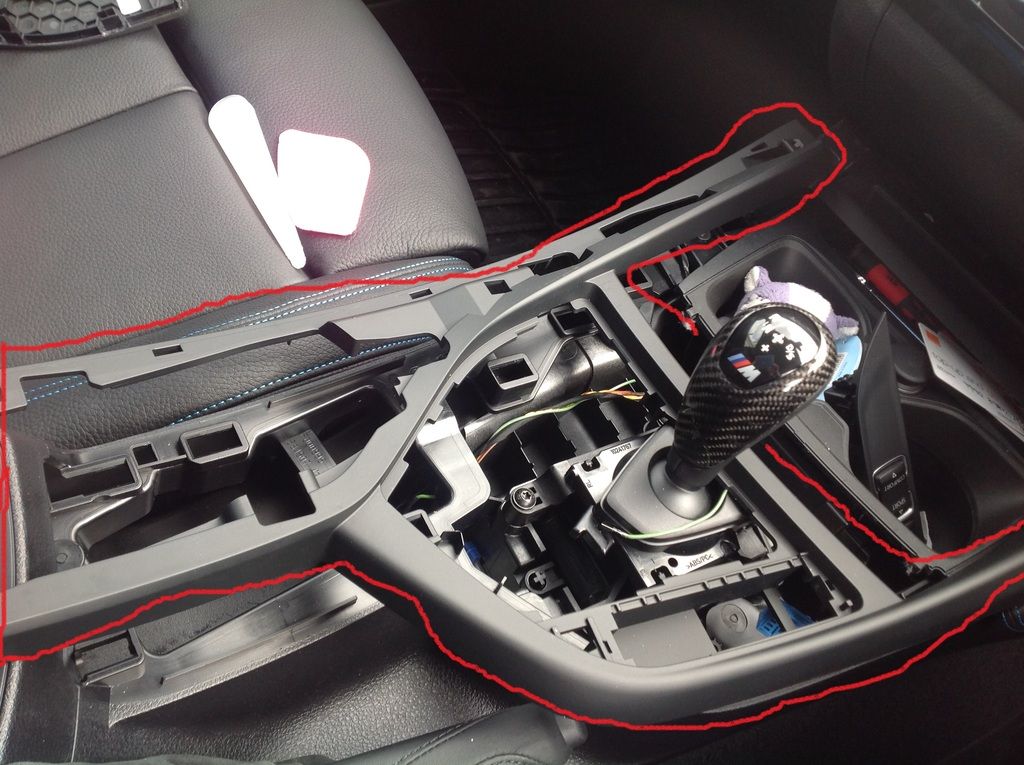 Now its just a matter of plugging in your replacement console switch connector (you should have already purchased) and reseat it in the console. 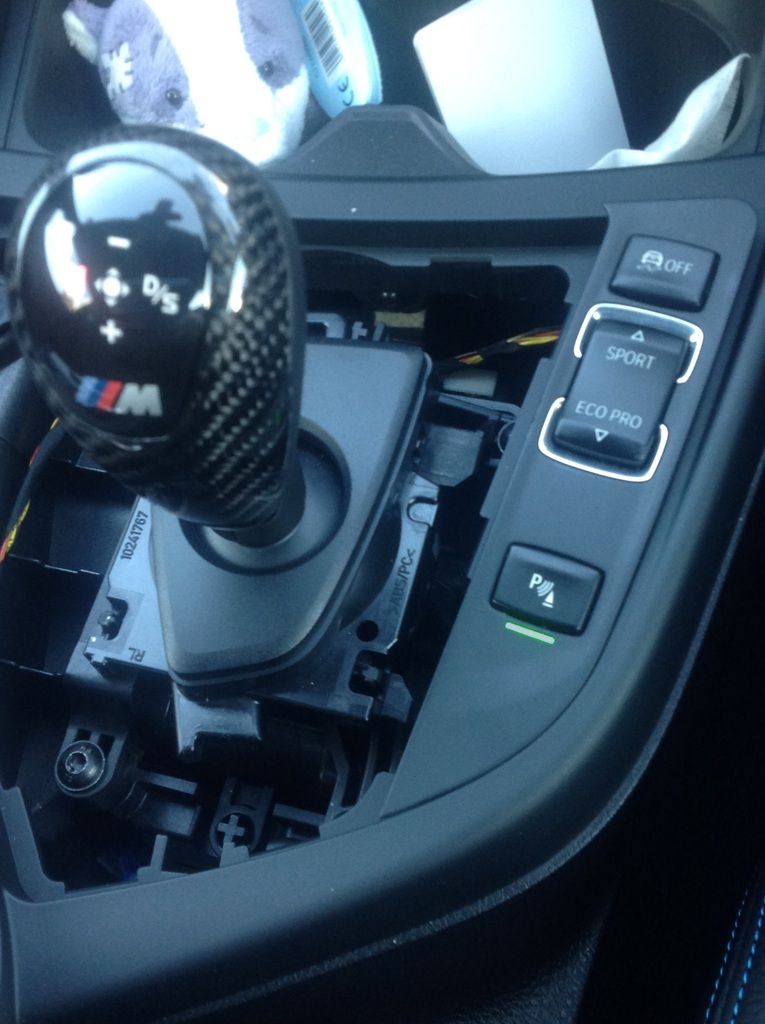 You are done with the install now.... It's just a matter of putting everything back together. Getting the air duct back in is the single most difficult thing I found with the whole process, you need to squeeze the narrow end to get it in and then the side of the duct will catch on the hand break earth point and then get fowled on a piece of white plastic (you need to squeeze the end again, further pushing on the duct from back of the car and watching where it gets fowled. The clearance above the ICM unit is very tight and you just have to take your time till it clears it. Slowly with persistence and you will get there. The last tricky bit is getting the air duct to re-engage towards the front of the centre console (This took 5 - 10 mins of wiggling it around until it engaged. Once its engages double check the air duct is all the way in and left and right clips as circled in red previously are clipped in correctly. Once back in place, re-attach rear vent plate (remember the 2 x wire connectors for the, 12v socket and the illumination). In my case the surround went back fine but the vents popped out, for some reason the vents needed to be re-seated into the air duct (I thought it was weird). Clip back in to place the USB Phono Socket inside the armrest and the handbrake boot (Start at the bottom and work up), next do the gear stick surround. Almost done, re-attach the blue connector to the underside of the control pad trim and re-install. Make sure the narrow end of the trim is engaged first then work back. Finally, re-connect negative connector to battery and take the car for a test drive and try out the button. Disclaimer: This process worked for me, if you damage or balls up you console trim or cannot get it back together again I will not be liable. Only tackle this modification if you have good DIY skills and are familiar with removing car trim. Do Not, and I mean DO NOT use metal screwdrivers, blades or any metal to lift plastic trim you will damage the trim and again I will not be liable. You have been warned. Finally, I would also like to thank member bmwdd for providing the info especially since he does not have an M2, without his posts keeping me on the right track I would not have achieved this Last edited by mjsaville; 04-22-2017 at 05:05 PM.. |
|
Appreciate
7
|
| 04-23-2017, 06:46 AM | #136 | |
|
Private
 23
Rep 67
Posts |
Quote:
|
|
|
Appreciate
1
mjsaville101.00 |
| 10-13-2017, 07:15 AM | #137 | |
|
Enlisted Member
 
3
Rep 47
Posts |
Quote:
I'm doing the Front PDC retrofit as of now and it is the connection of this little wire (Pin 28 on the ICM module) that gives me headache. I was able to disconnect the A78*1B (54-pin black socket/connector) through the handbrake boot. Now I'm hardly able to manipulate the socket to disassemble the inner connectors. Would it help me having more room to work (from above) if I remove the centre console trim? Note that I have a US F30. Thanks, Alain |
|
|
Appreciate
0
|
| 10-14-2017, 03:06 PM | #138 | |
|
Second Lieutenant
101
Rep 246
Posts |
Quote:
MJ |
|
|
Appreciate
0
|
| 10-16-2017, 04:07 PM | #139 | |
|
Enlisted Member
3
Rep 47
Posts |
Quote:
Then I had to reinsert the socket into the module. It is a lot easier if you put some wood pieces below the socket entry point of the ICM module. Having a flat and levelled surface, it is easy to slide the socket back into place and secure it with the latch. Remove the wood pieces afterwards. |
|
|
Appreciate
0
|
| 10-21-2017, 10:26 AM | #140 | |
|
Brigadier General
 
10911
Rep 4,541
Posts
Drives: 2015 328d xDrive
Join Date: Aug 2010
Location: NoVA
|
Quote:
|
|
|
Appreciate
3
|
| 11-01-2017, 03:19 AM | #142 |
|
;-;
8
Rep 10
Posts |
fixed in latest i-step firmware update
So, I installed the switch, which works great, and then the next day I flashed the whole car to the latest I-Step firmware with esys and apparently this was fixed in software. By default it now shuts off the camera and stops beeping immediately upon pulling it out of reverse (manual in my case).
Tomorrow I'm going to see if I can code the camera to stay up longer so I can watch as I pull forward over/into parallel parking brackets, like before. Updated car from I-Step F020-17-03-505 to F020-17-07-507 |
|
Appreciate
2
CommitConfirm474.50 TXSurfer99.00 |
| 11-01-2017, 04:38 PM | #143 | |
|
I INDIC8
612
Rep 1,286
Posts
Drives: 2018 LBB M2, 6MT
Join Date: Dec 2016
Location: Cleveland, OH
|
Quote:
I want to know if it's possible to use the button to enable the camera even when not reversing. I can press it while driving forward, and the parking sensor screen comes up, but the camera is disabled. I can use the iDrive knob to try to enable it, but it doesn't work.
__________________
2004 Matrix XRS 6MT => 2008 VW R32 DSG => 2012 Audi TTRS 6MT => 2018 BMW ///M2 6MT
I'm an IT guy by trade and tech nerd by choice.  I like HPDEs, parts of US Hwy 129, NC 28, and the Cherohala Skyway. I'm also a fan of aural pleasure.  |
|
|
Appreciate
0
|
| 11-01-2017, 05:06 PM | #144 | |
|
;-;
8
Rep 10
Posts |
Can you check your I-Step level? Curious if you have an earlier revision.
That said, I played with it some more today and it seems to behave differently depending on the situation - I'm assuming by design. If I'm stopped and I put it into reverse and pull it out again, the camera and sensors will stay on. It turns off as I start to move forward, like before. If I put it into reverse, back into a space, and then pull it out of reverse, the camera and sensors immediately shut off - which is a welcome new behavior. Quote:
|
|
|
Appreciate
0
|
| 11-01-2017, 05:14 PM | #145 |
|
I INDIC8
612
Rep 1,286
Posts
Drives: 2018 LBB M2, 6MT
Join Date: Dec 2016
Location: Cleveland, OH
|
Yesterday I backed up a very tight concrete ramp and through a narrow garage door so I could throw my snow setup into the car (had it delivered to a warehouse at work). Car's ass was close to a wall and the parking sensors were going red and solid tone. Pulled it out of R and put it in neutral + handbrake so I could get out and check how much space I had, and continued hearing the sensor noise even after getting out (needed to make sure I had room to put a wheel in the trunk).
How do I check I-step, is that something I need to do in ESYS? I have the cable and app and all of that, but I still haven't had the time to sit down in the car and mess around with coding (been too busy with work and making space for this car in my cramped garage at home).
__________________
2004 Matrix XRS 6MT => 2008 VW R32 DSG => 2012 Audi TTRS 6MT => 2018 BMW ///M2 6MT
I'm an IT guy by trade and tech nerd by choice. I like HPDEs, parts of US Hwy 129, NC 28, and the Cherohala Skyway. I'm also a fan of aural pleasure. |
|
Appreciate
0
|
| 11-02-2017, 04:39 PM | #146 | |
|
;-;
8
Rep 10
Posts |
Quote:
|
|
|
Appreciate
0
|
| 12-10-2017, 04:00 PM | #147 | |
|
Lieutenant
99
Rep 445
Posts |
Quote:
__________________
 |
|
|
Appreciate
0
|
| 03-11-2018, 07:11 PM | #148 |
|
Second Lieutenant

162
Rep 259
Posts |
Hi All,
I know that the newer ISTEP software has brought about some improved PDC behaviour ... and my MY18 LCI came with these updates. I like to be able to control when the camera turns on/off a bit, so I purchased the switch anyway. I recently took the car for its running-in service, and as part of that, the dealer reflashed the car and with the installation of the latest ISTEP, I lost the ability to turn on the reversing camera. A quick play with Bimmercode fixed the problem, so I thought that I'd let folks here know if they were still looking for how to control the behaviour of the reversing camera so that it can be turned on when the car is in motion (i.e. going forward) and so it doesn't cut out immediately when driving off. I find this useful for being sure that when pulling forward into a car spot, I know when the rear of the car is in the white line markings without having to stop the car and put it into reverse  Settings on the car after the dealer updated the ISTEP (i.e. button not able to activate the camera):  Problem fixed - reverse camera able to be activated using the button:  Eagle eyed folks may notice I also changed the behaviour of the PDC, such that it matched the behaviour of the reversing camera. Hope this helps! Cheers, |
|
Appreciate
1
thetastelingers4169.00 |
| 06-18-2018, 02:04 PM | #149 |
|
Enlisted Member
9
Rep 39
Posts |
Looking to add the sensor on/off part.
I don't have a rear view camera so is this just a straight swap of current part for the item with the extra PDC on/off button or do I have follow these posts on wiring? |
|
Appreciate
0
|
| 06-28-2018, 01:22 PM | #150 |
|
BMW Newb
581
Rep 903
Posts |
Just did this mod, popped out the old panel and installed in the new one. What a difference...can't believe I've put up with this annoyance for so long...should have done this ages ago.
|
|
Appreciate
0
|
| 06-29-2018, 05:28 AM | #151 | |
|
Enlisted Member
9
Rep 39
Posts |
Quote:
|
|
|
Appreciate
0
|
| 06-29-2018, 05:36 AM | #152 | ||
|
BMW Newb
581
Rep 903
Posts |
Quote:
|
||
|
Appreciate
0
|
| 06-30-2018, 11:16 AM | #153 | |
|
Private
35
Rep 55
Posts |
Quote:
|
|
|
Appreciate
0
|
| 07-10-2018, 01:54 PM | #154 | |
|
Private First Class

246
Rep 146
Posts
Drives: '76 2002 / '17 F87 M2
Join Date: Mar 2016
Location: MA
|
Quote:
As standard when you replace the switch it will behave as normal (turn off when in gear moving forward), but nice to use if someone is insanely close to me at a red light. Happens more often then you think 
__________________
2017 M2 - LBB, 6MT, Exec, ED (April 2017), PCD (July 2017)
Instagram - @LongBeachBlueM2 My M2 European Delivery Adventure - April 2017 / Part II - Performance Center Re-Delivery - July 2017 Last edited by longbeachbluem2; 01-09-2020 at 08:58 AM.. |
|
|
Appreciate
0
|
Post Reply |
| Bookmarks |
|
|


