C) Volume Control (Remote Audio Adaptor RAA)
A good set of pry tools are your friend!
Refer to this link for pictures on removing the center console trim.
Link:
http://f80.bimmerpost.com/forums/sho....php?t=1070897
http://f80.bimmerpost.com/forums/sho....php?t=1023437
1) Remove CF trim, starting from rear passenger side corner with a pry-tool. Get leverage, and incrementally pull upwards towards the front of the vehicle. You will feel each clip pop out of place.
2) Unplug the iDrive controller plug on the underside.
3) *6MT owners* Remove the shift boot by pulling on the edges of the shift boot where it is attached to a bezel. The second link has a video for 6mt.
4) Remove the plastic trim surround by starting at the rear driver side part and pulling up. Detach the plug connecting to the DSC/Sport/Comfort buttons. Note: Removing shift boot/plastic trim may not be necessary, but I found it helpful in snaking up the wires later for the Remote Audio display.

5) On to the actual Valentine Remote Audio Adaptor. Pull directly out on the volume knob to remove it. Then remove the mute knob behind it. Remove the screws at the bottom. Use a xacto knife or razor to gently lift the controller’s front-face sticker off, save for later since we will reuse this. Pull the plastic surround off the RAA and take the time to label one of the RJ-11 ports with “IN” to denote that as the receiving end of the main power.
6) Test fit the disassembled Remote Audio Adaptor behind the center console trim. Mark your center lines.

7) With the Remote Audio Adaptor sticker, remove the adhesive and use masking tape to make a stencil. Drill the hole for the volume-knob first. I put masking tape on both the top and bottom of the trim because I didn’t want the CF side to have any frayed edges later.
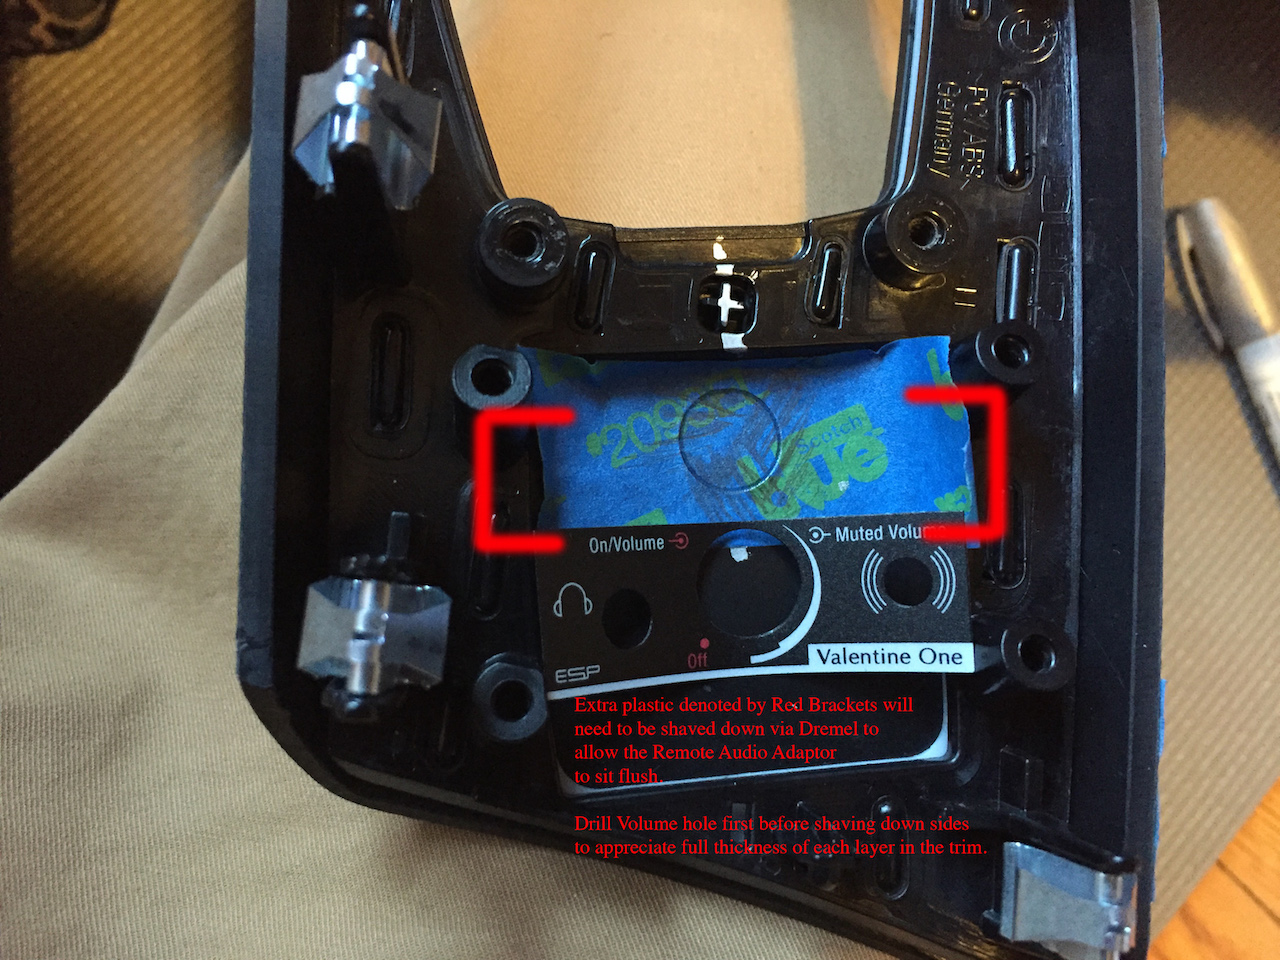
8) To make the Remote Audio Adaptor sit flush enough with the trim to have the button go through, you need to trim some of the underside of the center console trim. This way if you want to reverse this mod, its just one OEM trim piece you need to replace. The area denoted in the picture above, between the red brackets, was what I needed to trim down using a dremel. Again, it helped to drill the volume-knob hole first since this gave me an appreciation of the full thickness of the unit. There are multiple layers of plastic on this side, so in reality, I never even reached the upper CF trim during this stage.
9) Last, drill the other holes (speaker hole, and 3.5mm headphone jack hole) for the Remote Audio Adaptor. Make another template and affix it to the front, confirming that you are parallel to the CF weave and iDrive controller.

10) Sugru to the rescue again to affix the Remote Audio Adaptor in place. I love this stuff. I put the plastic surround back on to confirm I didn’t need to trim anything else for fitment. Sugru is moldable for half an hour, and cures over 24 hrs.

11) While the surgu was curing, I superglued the Remote Audio Adaptor front-sticker to the trim and reinstalled the volume/mute knob.

12) As far as the wiring goes, I used a penlight to open the space between the center plastic trim and the carpet. I then used a coat hanger to fish the RJ11 through to the center area near where the iDrive controller is. The last step is tucking all the wires beneath the trim. See Step 9 of Part D.
